SIGN IN YOUR ACCOUNT TO HAVE ACCESS TO DIFFERENT FEATURES

FORGOT YOUR PASSWORD?

FORGOT YOUR DETAILS?

AAH, WAIT, I REMEMBER NOW!
QUESTIONS? Contact Us | 866-824-4459

ZenTek ConsultantsZenTek Consultants

  • Architecture
    • Services
      • TEK Bloks
      • BIM Services
      • CAD Standards Service
      • Civil 3D Kickstart
      • BricsCAD Pilot Program
      • Moving to BricsCAD
      • Bluebeam Tool Chest Customization Services
      • Construction Support Services
      • Construction Project Setup in Bluebeam Revu
      • Microsoft 365 Implementation
      • Microsoft Teams Services
      • SharePoint Online Services
    • Training Options
      • Autodesk Revit Online Courses
      • AutoCAD Online Courses
      • AutoCAD Civil 3D Online Courses
      • Autodesk 3ds Max Online Courses
      • Autodesk Navisworks Online Courses
      • BricsCAD Online Courses
      • Bluebeam Revu Online Courses
      • Microsoft Online Courses
      • Custom Training
      • Training Waitlist
    • Software
      • BricsCAD
      • Bricsys 24/7
      • Bluebeam Revu
      • Microsoft
  • Engineering
    • Services
      • TEK Bloks
      • CAD Standards Service
      • BIM Services
      • Civil 3D Kickstart
      • BricsCAD Pilot Program
      • Moving to BricsCAD
      • Microsoft 365 Implementation
      • Microsoft Teams Services
      • SharePoint Online Services
    • Training Options
      • AutoCAD Civil 3D Online Courses
      • AutoCAD Online Courses
      • Autodesk Revit Online Courses
      • BricsCAD Online Courses
      • Civil Site Design Online Courses
      • Bluebeam Revu Online Courses
      • Microsoft Online Courses
      • Custom Training
      • Training Waitlist
    • Software
      • Civil Site Design
      • Stringer Topo
      • BricsCAD
      • Bricsys 24/7
      • Bluebeam Revu
      • Microsoft
  • Construction
    • Services
      • TEK Bloks
      • Bluebeam Tool Chest Customization Services
      • Construction Support Services
      • Construction Project Setup in Bluebeam Revu
      • Services for Procore
      • BIM Services
      • CAD Standards Service
      • Civil 3D Kickstart
      • BricsCAD Pilot Program
      • Moving to BricsCAD
      • Microsoft 365 Implementation
      • Microsoft Teams Services
      • SharePoint Online Services
    • Training Options
      • Bluebeam Revu Online Courses
      • Procore Online Courses
      • AutoCAD Online Courses
      • Autodesk Revit Online Courses
      • Autodesk Navisworks Online Courses
      • Autodesk 3ds Max Online Courses
      • AutoCAD Civil 3D Online Courses
      • BricsCAD Online Courses
      • Civil Site Design Online Courses
      • Microsoft Online Courses
      • Custom Training
      • Training Waitlist
    • Software
      • Bluebeam Revu
      • ZenEstimate Tools
      • ZenTek Revu Tools
      • Procore
      • Civil Site Design
      • Stringer Topo
      • BricsCAD
      • Bricsys 24/7
      • Microsoft
  • Manufacturing
    • Training Options
      • AutoCAD Online Courses
      • BricsCAD Online Courses
      • Microsoft Online Courses
      • Custom Training
      • Training Waitlist
    • Software
      • BricsCAD
      • Bricsys 24/7
      • Bluebeam Revu
      • Microsoft
  • Events
    • Upcoming Events
    • Live Webinars
    • On-Demand Webinars
  • Resources
    • Blog
    • The CADDLE Call Podcast
    • YouTube Channel
    • Planswift Training: Planswift Pros
    • Promotions
  • About Us
    • News
    • Contact Us

Standardization using View Templates in Autodesk Revit®

ZenTek Consultants
Wednesday, 13 November 2019 / Published in AEC, Autodesk Revit

Standardization using View Templates in Autodesk Revit®

Revit View Templates

How much time do you waste changing view settings in every view? Of course, time is money. You can save time – and money – by standardizing your Revit views using View Templates.

View Templates are found on the View tab, Graphics panel. The drop-down gives options for creating View Templates that can be applied to like views. The View Templates contain all of the Visibility Graphics settings, as well as other display options, scale, and rendering settings.

Revit View Templates

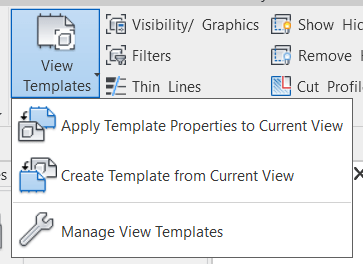
Figure 1 View Templates – View tab, Graphics panel

To apply a default View Template, select Apply Template Properties to Current View. In the example below, the default View Template settings for an Architectural floor plan are shown. Once changes are made in this dialog box, all views using this View Template will update to the new settings. Also, once a View Template is applied, the settings will be grayed out in their original locations, and only accessible through the View Template. If there are settings that need to be set per view, for example Scale or Detail Level, uncheck the box under Include. This will return the original setting location to its default accessibility.

Revit View Templates

Figure 2 View Template Dialog Box

Revit View Templates

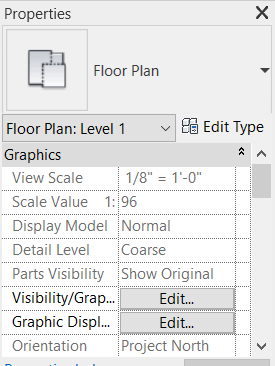
Figure 3 Grayed out View Settings indicating a View Template is applied

To create a custom View Template, you have a few options. First would be to set all of the settings individually in the view, and then use the Create Template from Current View on the View Templates drop-down menu. The second option would be to open the View Templates dialog box. In the lower left corner, use the Duplicate and Rename buttons to start a new View Template based on an existing one. Adjust the settings required and click Apply. The upper right corner of the View Templates dialog box shows how many views are using the selected View Template – this can be handy when making changes to understand how many views will be affected by the change.

Revit View Templates

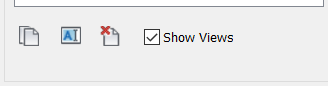
Figure 4 View Template dialog – Duplicate, Rename, Delete, and Show Views

Also in the lower left corner is a check box called Show Views. This shows the settings of all views of the same view type as the current view, for example all Plan views or all Elevation views. Select a view to apply the same settings to the current view. The difference is that this will only change the settings, it will not lock the view into a View Template. A View Template must be created and applied in order to lock the settings.

To find whether a View Template has been applied to a view, look in the Properties dialog box under Identity Data. The View Template option is the same as the View Templates button on the View tab. Once again, modifications made through the View Template button on the Properties dialog will affect all views assigned to that View Template.

View Templates can be created in a project template for company standardization. Users still have the ability to modify the settings, however creating general standards that work in 95% of projects will help to save critical time and rework.

What you can read next

The CADDle Call podcast
Scan to BIM – Dream or Reality?
Civil 3D Parcels
Using Parcels for Grading
BricsCAD Manipulator Tool
BricsCAD Manipulator – Sketch Anywhere with Dynamic UCS

Leave a Reply Cancel reply

Your email address will not be published. Required fields are marked *

Recent Posts

  • Procore: Uploading Drawing Revisions

  • The CADDle Call podcast

    Why is There Still a lot of Paper in Paperless Design?

  • Gradings in AutoCAD Civil 3D

  • The CADDle Call podcast

    What’s New in the Autodesk World

  • Easy Electrical Circuits Using Revit

Categories

Archives

  • Services
  • Software
  • Online Training
  • Leasing Options
  • About Us
  • Contact Us
  • Privacy Policy
  • Events
  • The CADDle Call Podcast
  • Blog
  • YouTube Channel
  • Promotions
  • Subscribe to Emails

Official Bricsys Reseller

Bluebeam Partner

Procore Certified Consultant

ACCNJ Member

  • GET SOCIAL

©2016 - 2021 ZENTEK. LLC TOP