SIGN IN YOUR ACCOUNT TO HAVE ACCESS TO DIFFERENT FEATURES

FORGOT YOUR PASSWORD?

FORGOT YOUR DETAILS?

AAH, WAIT, I REMEMBER NOW!
QUESTIONS? Contact Us | 866-824-4459

ZenTek ConsultantsZenTek Consultants

  • Architecture
    • Services
      • TEK Bloks
      • BIM Services
      • CAD Standards Service
      • Civil 3D Kickstart
      • BricsCAD Pilot Program
      • Moving to BricsCAD
      • Bluebeam Tool Chest Customization Services
      • Construction Support Services
      • Construction Project Setup in Bluebeam Revu
      • Microsoft 365 Implementation
      • Microsoft Teams Services
      • SharePoint Online Services
    • Training Options
      • Autodesk Revit Online Courses
      • AutoCAD Online Courses
      • AutoCAD Civil 3D Online Courses
      • Autodesk 3ds Max Online Courses
      • Autodesk Navisworks Online Courses
      • BricsCAD Online Courses
      • Bluebeam Revu Online Courses
      • Microsoft Online Courses
      • Custom Training
      • Training Waitlist
    • Software
      • BricsCAD
      • Bricsys 24/7
      • Bluebeam Revu
      • Microsoft
  • Engineering
    • Services
      • TEK Bloks
      • CAD Standards Service
      • BIM Services
      • Civil 3D Kickstart
      • BricsCAD Pilot Program
      • Moving to BricsCAD
      • Microsoft 365 Implementation
      • Microsoft Teams Services
      • SharePoint Online Services
    • Training Options
      • AutoCAD Civil 3D Online Courses
      • AutoCAD Online Courses
      • Autodesk Revit Online Courses
      • BricsCAD Online Courses
      • Civil Site Design Online Courses
      • Bluebeam Revu Online Courses
      • Microsoft Online Courses
      • Custom Training
      • Training Waitlist
    • Software
      • Civil Site Design
      • Stringer Topo
      • BricsCAD
      • Bricsys 24/7
      • Bluebeam Revu
      • Microsoft
  • Construction
    • Services
      • TEK Bloks
      • Bluebeam Tool Chest Customization Services
      • Construction Support Services
      • Construction Project Setup in Bluebeam Revu
      • Services for Procore
      • BIM Services
      • CAD Standards Service
      • Civil 3D Kickstart
      • BricsCAD Pilot Program
      • Moving to BricsCAD
      • Microsoft 365 Implementation
      • Microsoft Teams Services
      • SharePoint Online Services
    • Training Options
      • Bluebeam Revu Online Courses
      • Procore Online Courses
      • AutoCAD Online Courses
      • Autodesk Revit Online Courses
      • Autodesk Navisworks Online Courses
      • Autodesk 3ds Max Online Courses
      • AutoCAD Civil 3D Online Courses
      • BricsCAD Online Courses
      • Civil Site Design Online Courses
      • Microsoft Online Courses
      • Custom Training
      • Training Waitlist
    • Software
      • Bluebeam Revu
      • ZenEstimate Tools
      • ZenTek Revu Tools
      • Procore
      • Civil Site Design
      • Stringer Topo
      • BricsCAD
      • Bricsys 24/7
      • Microsoft
  • Manufacturing
    • Training Options
      • AutoCAD Online Courses
      • BricsCAD Online Courses
      • Microsoft Online Courses
      • Custom Training
      • Training Waitlist
    • Software
      • BricsCAD
      • Bricsys 24/7
      • Bluebeam Revu
      • Microsoft
  • Events
    • Upcoming Events
    • Live Webinars
    • On-Demand Webinars
  • Resources
    • Blog
    • The CADDLE Call Podcast
    • YouTube Channel
    • Planswift Training: Planswift Pros
    • Promotions
  • About Us
    • News
    • Contact Us

Managing Autodesk Revit® Links

ZenTek Consultants
Wednesday, 22 January 2020 / Published in AEC, Autodesk Revit

Managing Autodesk Revit® Links

Insert Tab – Link Panel

Linking files into Revit can be a complicated task if unmanaged. Setting standards for links in Revit projects can help alleviate disorganization and frustration when collaborating with multiple team disciplines.

For simplified referencing for Revit models, it is important to establish a Project Base Point before starting a project. The Project Base Point can be found under the Site category in the Visibility/Graphics Overrides for a plan view. This may or may not coincide with the Survey Base Point. Communicate with team members regarding the coordinates being used or the relation of the building to the Project Base Point.

Use the Link Revit Option on the Insert tab, Link Panel to link a Revit project. As long as both projects use the same Project Base Point, insert the link using the Auto – Project Base Point to Project Base Point option in the Import/Link RVT dialog box. Using the Project Base Point will eliminate the need to move the model once it is loaded into the project. This can be said for any origin point used to link the project, however the Project Base Point does not have to be tied to any particular coordinates.

Walls Set at Project Base Point

Figure 1 – Walls Set at Project Base Point

Project Base Point Option for Inserting

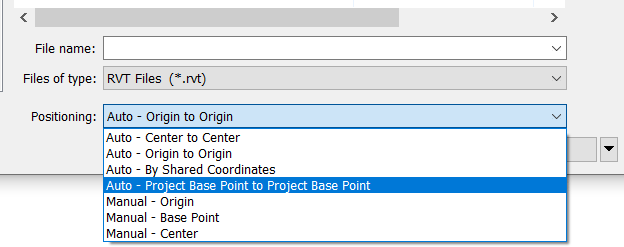
Figure 2 – Project Base Point Option for Inserting


Other file types that can be linked into Revit using the Link CAD button include DWG, DXF, DGN, ASCII SAT, and Sketchup files. Link Topography requires the Autodesk Desktop Connector (separate download) to link Civil 3D files via BIM 360. Point clouds can also be linked into the Revit project, although file size can become an issue. Navisworks (.nwd and .nwc) files can be linked into Revit for viewing and coordination using the Coordination Model button. All of the previous can be found on the Insert tab.

Insert Tab – Link Panel

Figure 3 – Insert Tab – Link Panel


The Manage Links button opens a dialog showing all files that are linked into the current Revit project. There are separate tabs for Revit, IFC, CAD Formats, DWF Markups, Point Clouds, and Topography. Links may be unloaded for easier temporary project navigation and performance, and reloaded without losing the link integrity. Links that are “removed” will no longer reside in the model and will need to be re-linked manually.

Importing CAD files is different from Linking CAD files in Revit. Imported files become a part of the project and lose their connection to the source file. If the file is updated, those changes will not show in the Revit project.

When using links in Revit, consider using Worksets if the model will be shared. In this way, visibility as well as access can be controlled globally using Worksets without the need to unload/reload the link.

Visibility/Graphic Overrides for Links using Worksets

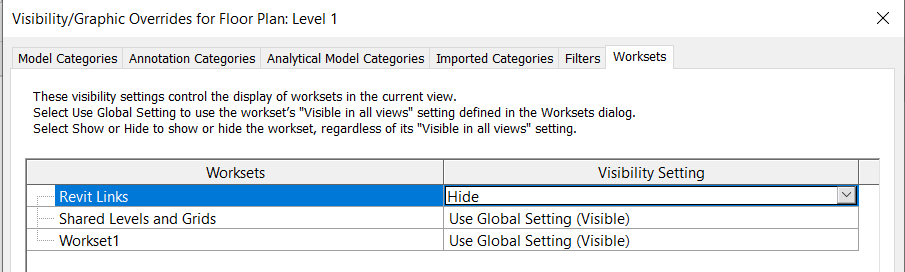
Figure 4 -Visibility/Graphic Overrides for Links using Worksets


Links can be useful for coordination, however too many links will slow down a project. Consider only loading links that are necessary as needed, and unload links when not in use.

What you can read next

Better, Faster and Smarter: CAD Gets a Facelift
Gradings in AutoCAD Civil 3D
The CADDle Call podcast
Procore: Promises vs Practical Performance

Leave a Reply Cancel reply

Your email address will not be published. Required fields are marked *

Recent Posts

  • Procore: Uploading Drawing Revisions

  • The CADDle Call podcast

    Why is There Still a lot of Paper in Paperless Design?

  • Gradings in AutoCAD Civil 3D

  • The CADDle Call podcast

    What’s New in the Autodesk World

  • Easy Electrical Circuits Using Revit

Categories

Archives

  • Services
  • Software
  • Online Training
  • Leasing Options
  • About Us
  • Contact Us
  • Privacy Policy
  • Events
  • The CADDle Call Podcast
  • Blog
  • YouTube Channel
  • Promotions
  • Subscribe to Emails

Official Bricsys Reseller

Bluebeam Partner

Procore Certified Consultant

ACCNJ Member

  • GET SOCIAL

©2016 - 2021 ZENTEK. LLC TOP